展示各式各樣繪圖範例, 實在太棒了!!!
matplotlib第一印象就是跟MATLAB繪圖風格超像, 因此學他就對了!
以下為官網展示範例中一部分, 先睹為快~
------------------------------------------------
接下, 開始撰寫第一個繪圖
# -*- coding: utf-8 -*-"""
Created on Wed Oct 26 09:25:28 2016
@author: me1237guy
"""from matplotlib.font_manager import FontProperties
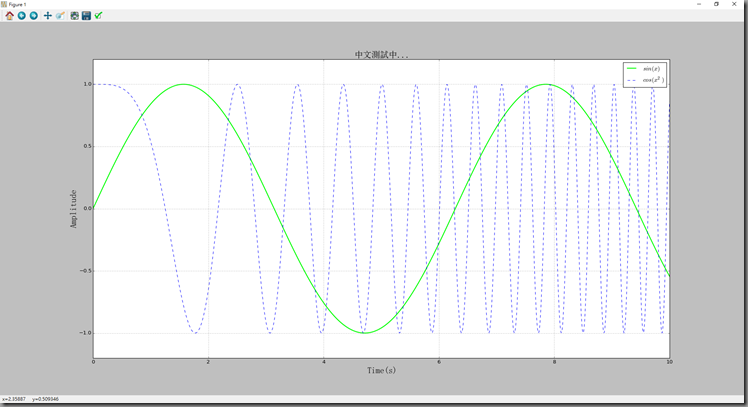
font = FontProperties(fname=r"c:\windows\Fonts\SimSun.ttc", size=20)import numpy as npimport matplotlib.pyplot as pltx = np.linspace(0, 10, 1000)
y = np.sin(x)
z = np.cos(x**2)
plt.figure(figsize=(8,4))
plt.plot(x, y, label="$sin(x)$", color="red", linewidth=2)
plt.plot(x, z, "b--", label="$cos(x^2)$")
plt.xlabel("Time(s)", fontproperties=font)plt.ylabel("Amplitude", fontproperties=font)plt.title(u"中文測試中...", fontproperties=font)plt.ylim(-1.2, 1.2)
plt.legend()
plt.grid()
plt.show()
1. 中文設定
from matplotlib.font_manager import FontProperties
font = FontProperties(fname=r"c:\windows\Fonts\SimSun.ttc", size=20)
2. 有用到中文的字串前面加上關鍵字 u, 並加上屬性fontproperties=font
plt.xlabel("Time(s)", fontproperties=font)
plt.ylabel("Amplitude", fontproperties=font)
plt.title(u"中文測試中...", fontproperties=font)
3. 前後$表示LaTeX數學公式
4. color 可用16進為 “#ff0000” 純紅色, 或是0~1三位數表示RGB, (1.0, 0.0, 0.0), 或是內建red
plt.plot(x, y, label="$sin(x)$", color="#00ff00", linewidth=2)
plt.plot(x, y, label="$sin(x)$", color="#ffff00", linewidth=2)
plt.plot(x, y, label="$sin(x)$", color=(0.0, 1.0, 1.0), linewidth=12)
5. 儲存fig
plt.savefig("F:\\python\\work\\test.png", dpi=120)
6. getp()
line1 = plt.plot(x, y, label="$sin(x)$", color=(0.0, 1.0, 1.0), linewidth=12)
plt.getp(line1)
line1 = plt.plot(x, y, label="$sin(x)$", color=(0.0, 1.0, 1.0), linewidth=12) plt.getp(line1)
agg_filter = None
alpha = None
animated = False
antialiased or aa = Trueaxes = Axes(0.125,0.1;0.775x0.8)
children = []
clip_box = TransformedBbox(Bbox('array([[ 0., 0.],\n [...clip_on = True
clip_path = None
color or c = (0.0, 1.0, 1.0)contains = None
dash_capstyle = butt
dash_joinstyle = round
data = (array([ 0. , 0.01001001, 0.02002002, ... drawstyle = defaultfigure = Figure(640x478)
fillstyle = full
gid = None
label = $sin(x)$
linestyle or ls = - linewidth or lw = 12marker = None
markeredgecolor or mec = (0.0, 1.0, 1.0) markeredgewidth or mew = 0.5 markerfacecolor or mfc = (0.0, 1.0, 1.0) markerfacecoloralt or mfcalt = none markersize or ms = 6.0markevery = None
path = Path(array([[ 0. , 0. ], [...path_effects = []
picker = None
pickradius = 5
rasterized = None
sketch_params = None
snap = None
solid_capstyle = projecting
solid_joinstyle = round
transform = CompositeGenericTransform(TransformWrapper(Blended...
transformed_clip_path_and_affine = (None, None)
url = None
visible = True
xdata = [ 0. 0.01001001 0.02002002 0.03003003 ...
xydata = [[ 0. 0. ] [ 0.01001001 0.010009...
ydata = [ 0. 0.01000984 0.02001868 0.03002552 ...
zorder = 2
------------------------------------------
# -*- coding: utf-8 -*-"""
Created on Wed Oct 26 11:09:13 2016
@author: 1234
"""import numpy as npimport matplotlib.pyplot as pltplt.figure(1) # 建立圖表1plt.figure(2) # 建立圖表2ax1 = plt.subplot(211)
ax2 = plt.subplot(212)
x = np.linspace(0, 3, 100)
for i in xrange(5):plt.figure(1)
plt.plot(x, np.exp(i*x/5))
plt.sca(ax1)
plt.plot(x, np.sin(i*x))
plt.sca(ax2)
plt.plot(x, np.cos(i*x))
plt.show()
---------------------------------------------------------------
# -*- coding: utf-8 -*-"""
Created on Wed Oct 26 14:23:07 2016
@author: Ryan Wang
"""import numpy as npfrom scipy import interpolate
import pylab as pldef func(x, y):
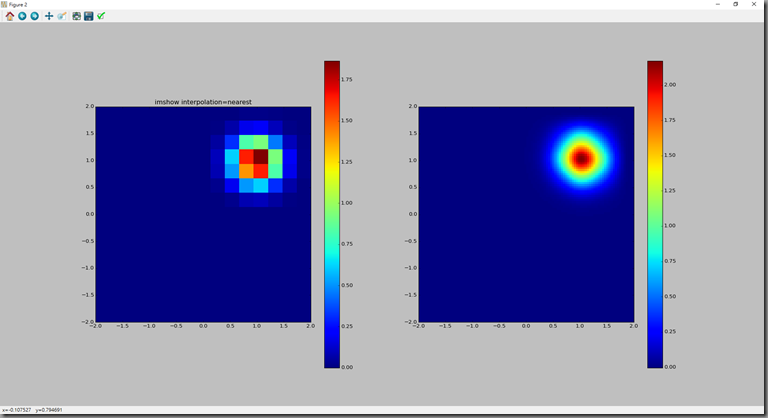
return (x+y)*np.exp(-5.0*((x-1)**2+(y-1)**2))pl.close('all') y, x = np.mgrid[-2:2:15j, -2:2:15j]
fvals = func(x, y)
xnew = np.linspace(-2, 2, 100)
ynew = np.linspace(-2, 2, 100)
# 二維插值newfunc = interpolate.interp2d(x, y, fvals, kind='cubic') fnew = newfunc(xnew, ynew)
pl.figure(1)
pl.subplot(121)
pl.imshow(fvals, extent=[-2,2,-2,2], cmap=pl.cm.jet, interpolation='none', origin="lower")
pl.colorbar()
pl.title('imshow interpolation=none')pl.subplot(122)
pl.imshow(fnew, extent=[-2,2,-2,2], cmap=pl.cm.jet, interpolation='none', origin="lower")
pl.colorbar()
pl.show()
pl.figure(2)
pl.subplot(121)
pl.imshow(fvals, extent=[-2,2,-2,2], cmap=pl.cm.jet, interpolation='nearest', origin="lower")
pl.colorbar()
pl.title('imshow interpolation=nearest')pl.subplot(122)
pl.imshow(fnew, extent=[-2,2,-2,2], cmap=pl.cm.jet, interpolation='nearest', origin="lower")
pl.colorbar()
pl.show()
pl.figure(3)
pl.subplot(121)
pl.imshow(fvals, extent=[-2,2,-2,2], cmap=pl.cm.jet, interpolation='bilinear', origin="lower")
pl.colorbar()
pl.title('imshow interpolation=bilinear')pl.subplot(122)
pl.imshow(fnew, extent=[-2,2,-2,2], cmap=pl.cm.jet, interpolation='bilinear', origin="lower")
pl.colorbar()
pl.show()
pl.figure(4)
pl.subplot(121)
pl.imshow(fvals, extent=[-2,2,-2,2], cmap=pl.cm.jet, interpolation='bicubic', origin="lower")
pl.colorbar()
pl.title('imshow interpolation=bicubic')pl.subplot(122)
pl.imshow(fnew, extent=[-2,2,-2,2], cmap=pl.cm.jet, interpolation='bicubic', origin="lower")
pl.colorbar()
pl.show()
------------------------------------------------------------
繪製兩條直線
fig.patch.set_color(): 設定Figure背景顏色
extend() 增加到Figure物件的lines屬性
remove() 刪除Figure物件的lines屬性中某一個物件
# -*- coding: utf-8 -*-"""
Created on Thu Oct 27 10:28:18 2016
@author: Ryan Wang
"""from matplotlib import lines
import matplotlib.pylab as pltfig = plt.figure(1)
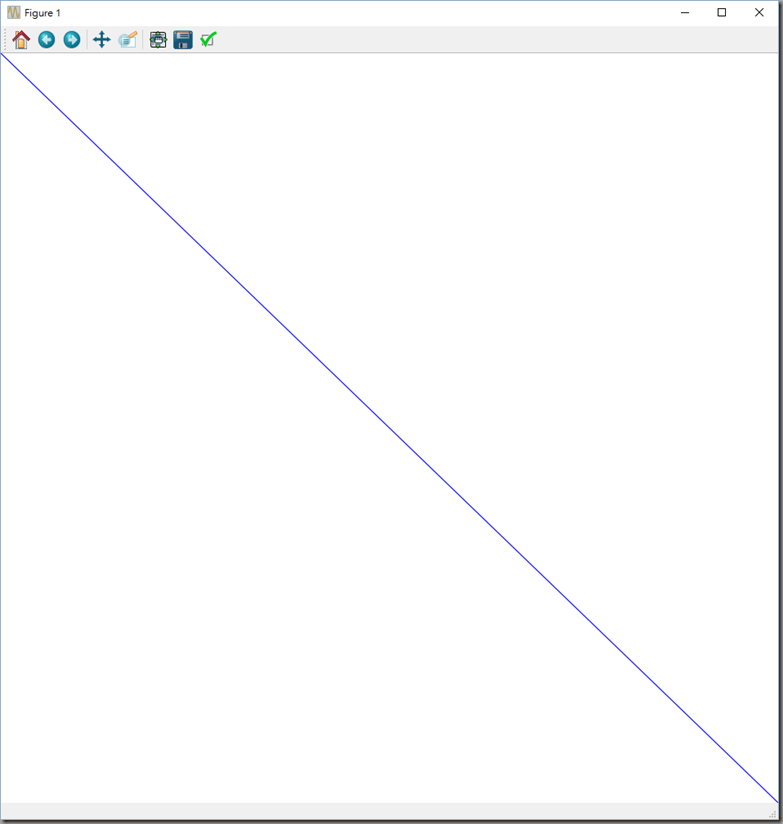
fig.patch.set_color("g")line1 = lines.Line2D([0,1],[0,1], transform=fig.transFigure, figure=fig, color="r")line2 = lines.Line2D([0,1],[1,0], transform=fig.transFigure, figure=fig, color="b")fig.lines.extend([line1, line2])
fig.canvas.draw()
pause(1)
fig.patch.set_color("w")fig.lines.remove(line1)
fig.canvas.draw()
更換背景至白色
刪除line1
------------------------------------------------
# -*- coding: utf-8 -*-"""
Created on Fri Oct 28 10:01:13 2016
@author: Ryan Wang
"""from matplotlib.font_manager import FontProperties
import numpy as npimport matplotlib.pyplot as pltplt.close('all')font = FontProperties(fname=r"c:\windows\fonts\simsun.ttc", size=14)x = np.random.random(10)
y = np.random.random(10)
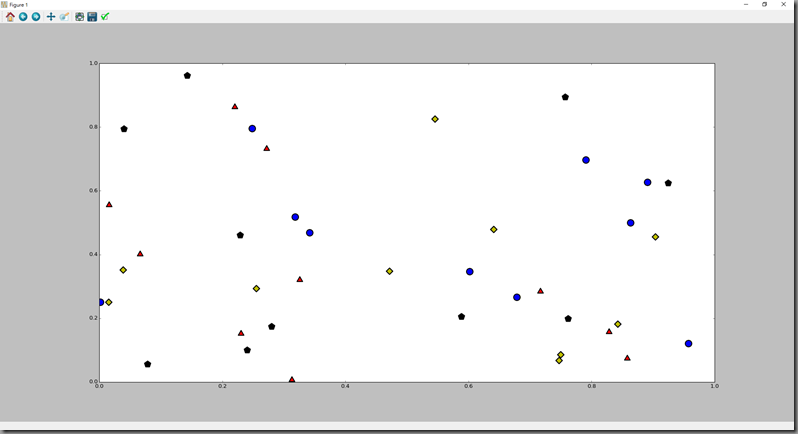
plt.scatter(x, y, s=200, c=u'b', marker=(1,3), alpha=1, lw=2) # marker 1:多邊形1, 3:忽略
x = np.random.random(10)
y = np.random.random(10)
plt.scatter(x, y, s=200, c=u'r', marker=(3,0), alpha=1, lw=2) # 3:三角形
x = np.random.random(10)
y = np.random.random(10)
plt.scatter(x, y, s=200, c=u'k', marker=(5,0), alpha=1, lw=2) # 3:五角形
x = np.random.random(10)
y = np.random.random(10)
plt.scatter(x, y, s=200, c=u'y', marker=(4,0), alpha=1, lw=2) # 3:四角形
plt.xlim(0, 1)
plt.ylim(0, 1)
------------------------------------------------
# -*- coding: utf-8 -*-"""
Created on Fri Oct 28 11:45:29 2016
@author: Ryan Wang
"""from enthought.mayavi import mlab
x =np.linspace(0, 100, 10000)
y = np.sin(x)
z = np.cos(x)
t=x
mlab.plot3d(x, y, z, t, tube_radius=0.2)
mlab.show()
參考資料
1. Python科學計算


 留言列表
留言列表


